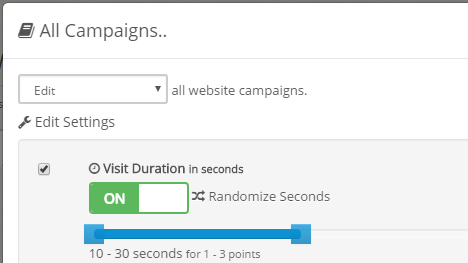
You can now select random visit durations for your website campaigns by toggling ON the Randomize Seconds button within the Visit Duration section and choosing any two values from 10 to 60 seconds.
You can also enable this feature within the Quick Actions -> Edit to update all existing website campaigns on a page or on your account.

Leave this feature OFF if you only wish to select one visit duration like you had previously.
Simply click and drag the Randomize Seconds button to the right for ON.

Use the slider to choose two visit durations you want your campaign to use. For example, if you select 10 – 30 seconds, visitors will randomly stay on your page for 10, 20 or 30 seconds and each visit will consume 1, 2 or 3 points per visit respectively.

Filed under: Documentation→Getting Started
Tags: 10khits, campaign, duration, interval, random, randomize, settings, time, visit, visit duration, visit durations, website, website campaigns

When you expand a website campaign panel, you’ll see 8 different boxes including a line graph at the bottom. Starting from the top left:
1. Site URL – the page that will receive hits from this campaign.
2. Status – the status of the campaign (active, paused, suspended or expired).
3. Traffic Source – hiding/masking where your hits are coming from.
4. Geo-targeting – whether geo-targeting is enabled or not. If enabled, it will list which countries the campaign is targeting.
5. Visit Duration – lists the duration of each hit from 10 to 60 seconds per hit.
6. Maximum Hits Per Hour – shows how many hits are remaining for the hour. For example, 75 of 500 remaining is the same thing as having received 475 hits out of the 500 maximum. There are still 75 hits remaining for you in the hour. Making changes to this setting will only take effect in the next hour. For instance, if you had 500 as your max but you change it to 300 after receiving 25 hits, it show up as 475 of 300 remaining. You will still use up a max of 475 hits this hour until the next hour begins and the setting is updated to 300.
7. Hits Limit – Displays whether you have a hits limit enabled on your campaign. If enabled, it will show the number of hits you’ve set for the lifetime of this campaign. Once that number is reached, the campaign will pause automatically.
8. Safe for Work? – displays whether the page is safe for work or not. Pages that are not safe for work are ones that contain pornography, nudity or profanity.
The line graph shows how many hits the website has received in the past 7 days for this campaign. There is also the number of hits today and hits total for the website campaign at the top right of the line graph in green and blue. You can zoom in for a more detailed graph by clicking and dragging your mouse. Click the reset zoom button to zoom out again.
Filed under: Documentation→Getting Started
Tags: campaign panel, duration, expand, geo, geo-targeting, getting started, hits limit, line graph, maximum hits per hour, mhph, my URLs, nsfw, panel, safe for work, site url, status, traffic source, URL panel, visit duration, website, website campaign panel, website panel


![]()
