How do I set random visit durations for my website campaigns?

You can now select random visit durations for your website campaigns by toggling ON the Randomize Seconds button within the Visit Duration section and choosing any two values from 10 to 60 seconds.

You can also enable this feature within the Quick Actions -> Edit to update all existing website campaigns on a page or on your account.

random visit duration all campaigns

Leave this feature OFF if you only wish to select one visit duration like you had previously.

Simply click and drag the Randomize Seconds button to the right for ON.

random visit duration ON

Use the slider to choose two visit durations you want your campaign to use. For example, if you select 10 – 30 seconds, visitors will randomly stay on your page for 10, 20 or 30 seconds and each visit will consume 1, 2 or 3 points per visit respectively.

visit duration selection


Filed under: DocumentationGetting Started
Tags: , , , , , , , , , , , ,


How do I manage my URLs?

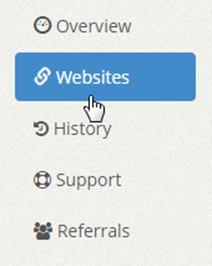
To manage your websites on 10KHits, click on the “Websites” tab on the left sidebar of the dashboard after logging into your account. Here you will find a list of websites you have added and website slots remaining on your account.
image022

By each website campaign there is the status of your campaign as follows:
Active campaigns that are currently receiving hits will have a green checkmark icon by it.
Paused campaigns will have a yellow minus icon by it.
Suspended campaigns will have a red exclamation icon by it.
Expired campaigns will have a gray X icon by it.

image218

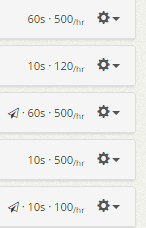
We have also listed some other useful information to help you quickly view your campaign settings without having to expand the panel or by going into the Manage Site settings. You may see some icons and numbers on the right of the panel. The icons help you know whether your campaign has white label traffic source (paper airplane icon) or geo-targeting (globe icon) enabled. The first number from the left represents the visit duration and the second number represents the Maximum Hits per Hour for that campaign.

For example, the first campaign uses 60 seconds visit duration and a maximum hits per hour of 500.
image220

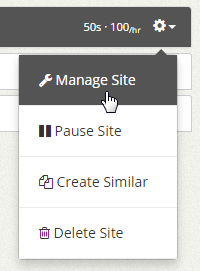
To manage a website campaign, simply click the gear icon on the right side of the panel. A drop down menu will show up in which you can manage site, pause site, create similar or delete site.
image023

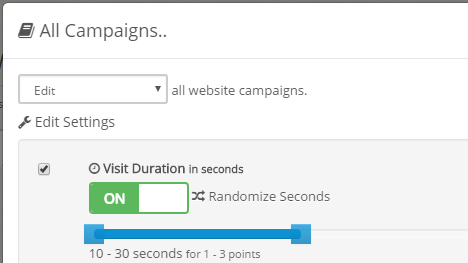
If you click the “Manage Site” option, you’ll be able to change the visit duration, maximum hits per hour, hits limit, traffic source (Pro and Business only), geo-targeting (Business only) and content screening.

Filed under: DocumentationGetting Started
Tags: , , , , , , , , ,


What is hits limit?

Hits limit is a useful setting to allocate how many hits you want a certain website to receive in its lifetime. This is a good feature for traffic resellers or people who own multiple websites and webpages. There are two options available: send as much traffic as possible or stop traffic after reaching limit.
image210

The first option is basically uncapping your campaign. You’ll receive as many hits for that URL as long as you have points. Once you run out of points, you will stop receiving hits.
image211

The second option lets you allocate a hit limit to that website in its lifetime. This is good setting for accounts that have multiple URLs. For example, if you have 3 different website campaigns running and you just purchased 100,000 points, you can set one website campaign to receive a 5,000 hit limit at 60 seconds visit duration (30,000 points), another with 15,000 hit limit at 20 second visit duration (30,000 points) and your last campaign can have a 40,000 hit limit at 10 second visit duration (40,000 points). Keep in mind that each hit will cost you 1 – 6 points each depending on your visit duration settings. You can always manage/edit your campaign settings if you need to change the hit limit.

Filed under: DocumentationGetting Started
Tags: , , , , , , , , , , , ,