How can I track my Adwords data in Google Analytics?
10 years ago
You should always link your Google Analytics with Adwords to track where your visitors are clicking, how much time they are on your site, how many conversions you get, which page makes your users leave your website the most, etc. There is an option to do that in Adwords, so don’t forget about linking your Adwords to your Analytics. It is very important to analyze how well your campaigns are working so you can make adjustments to it. You’ll have to use auto-tagging which allows you to import Adwords data into Analytics automatically. You can also manually tag but we recommend auto-tagging for additional details you wouldn’t get from manually tagging. Auto-tagging will allow you to see what happens after a user has clicked your ads. When you enable auto-tagging, a parameter called gclid will be added to your landing page URL like this: www.domain.com/?gclid=548abc.
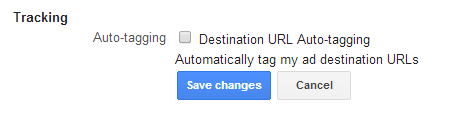
To enable auto-tagging in Adwords, go to the gears icon and select Account settings. In the preferences tab, you’ll find a Tracking section. Click Edit and checkmark Destination URL Auto-tagging and Save changes.
Auto-tagging will provide you with these detailed reporting in Google Analytics:
• Campaign
• Source
• Medium
• Content (creative)
• Keyword
• Query Match Type
• Ad Group
• Destination URL
• Ad Format
• Ad Distribution Network
• Placement Domain
• AdWords Customer ID (in case you have multiple accounts for your company)
• Hour of Day
• Placements
• Keyword Positions
If you don’t link your Analytics with Adwords and don’t use auto-tagging, you’ll get (not set) as the # of visitors that came from your campaigns. This does not help you because you’re getting clicks but you don’t know what happens after the click. This makes it impossible to measure your goals.
Filed under: Documentation→Search Engine Marketing
Tags: adwords, google adwords, Google Analytics, search engine marketing, tracking
What is quality score?
10 years ago
Quality Score is an estimate of the quality of your ads, keywords and landing pages. The higher your quality score, the better your Ad Rank (better ad position and lower cost-per-click).
Quality Score is decided from the expected CTR (click-through rate), ad relevance and landing page experience. If your ad is not relevant to the keyword, you will get low CTR and ultimately a bad Quality Score so make sure your ad copy is relevant to your keywords and create good landing pages.
Here are some ways to improve your Quality Score:
Filed under: Documentation→Search Engine Marketing
Tags: ad extensions, google adwords, quality score, search engine marketing
What is the Adwords Editor?
10 years ago
Adwords Editor is a great tool you can use to edit your campaigns quickly in bulk. This tool is a must have. You can download accounts, import and export files to make changes to an account, view statistics for your accounts, copy and move items between ad groups and keep working when you’re offline.
To download the Adwords Editor and to learn more about how to use it, you can visit:
http://www.google.com/intl/en_US/adwordseditor/
Filed under: Documentation→Search Engine Marketing
Tags: adwords editor, google adwords, search engine marketing
How do I create a page post engagement ad on Facebook?
10 years ago
Page post engagement is a great way to gain likes, comments and shares on your Facebook posts. You can create a post ad as a video, photo or text to engage your users. To do so, click on the “Build Audience” at the top right corner of your Facebook page and click “Use Ads Manager”. Click on the green button “Create Ad” and click “Page Post Engagement” from the list. From there, you can select which post you’d like to promote, target your audience and set a campaign pricing. It will take a few minutes for your ad to be approved.
For video ads, it is recommended to use 500 characters of text, 16:9 aspect ratio, 1080 resolution, .mov file format and no larger than 1 gigabyte. An example of what a video ad may look like on desktop, mobile and right side of Facebook:


For photo ads, it is recommended to use 90 characters of text, 1:1 image ratio (a perfect squared image) and 1200×1200 pixels image. Furthermore there is a 20% limit to how much text can be added in your photo. Having too much text in your photo will get your ad disapproved. You should use the Facebook grid tool to see how much text is being used on your photo: https://www.facebook.com/ads/tools/text_overlay. Here are what photo ads look like on desktop, mobile and right side of Facebook:


For text ads, it is recommended to use 90 characters of text. Here are what text ads look like on desktop, mobile and right side of Facebook:


Filed under: Documentation→Social Media Marketing
Tags: facebook ads, page post engagement ad, social media marketing
How can I gain page likes using Facebook Ads?
10 years ago
Go to your Facebook page after you have logged on and click “Build Audience” at the top right of your page. Click on “Use Ads Manager” and click “Create Ad” at the top right of your page. Click on “Page Likes” from the list.

Select your page from the dropdown or type in the URL of your Facebook page that you want to increase page likes for. After you have selected the Facebook page you want to promote, you can use up to 6 different images that will show up for your ad and 90 characters of text. Configure your audience targeting and set campaign pricing and click “Place Order”. It will take a few minutes for your ad to be approved.
Filed under: Documentation→Social Media Marketing
Tags: cpc, facebook ads, facebook likes, page likes, ppc, social media marketing
How do I receive clicks to website with Facebook Ads?
10 years ago
Go to your Facebook page after you have logged on and click “Build Audience” at the top right of your page. Click on “Use Ads Manager” and click “Create Ad” at the top right of your page. Click on “Clicks to Website” from the list. “Clicks to Website” works similar to “Page Likes” except it promotes a webpage instead of a Facebook page.

Enter the URL you want to promote and click “Continue”. Add up to 6 images for your ad and 90 characters of text. Configure your audience targeting and set campaign pricing and click “Place Order”. It will take a few minutes for your ad to be approved.
Filed under: Documentation→Social Media Marketing
Tags: clicks to website, cpc, facebook ads, facebook likes, ppc, social media marketing
How do I receive website conversions with Facebook Ads?
10 years ago
Website conversions on Facebook Ads are ads that promote a call-to-action that can be tracked with a tracking pixel. Go to your Facebook page after you have logged on and click “Build Audience” at the top right of your page. Click on “Use Ads Manager” and click “Create Ad” at the top right of your page. Click on “Website Conversions” from the list.

Enter the URL of the landing page. In this example, we want to convert users into signing up to our website. Once you have added the URL, you will need to click the “+” button to add a tracking pixel. This pixel will record how many times a user has converted. In this case, we created a tracking pixel and placed it on the page that shows when a user has finished their registration with us. There are many types of conversions to choose from: Checkouts, Registration, Leads, Key Web Page Views, Adds to Cart and Other Web Conversions.
Once you have given the tracking pixel a name like “Registration Complete”, you can add the pixel code that Facebook gives you to the registration completed page on your website. Depending on what you want to track, you will need to place the tracking pixel at the end of the funnel (the page that shows up when the user has completed the action you wanted on your website). This is how you verify your tracking pixel and how Facebook reports when a user has converted.

Filed under: Documentation→Social Media Marketing
Tags: cpc, facebook ads, ppc, social media marketing, website conversions