Filters allow you to include, exclude or change the way the data is shown in your reports. For example, you can create a filter to exclude IPs or to clean up URLs into readable text. If you have a filter that excludes an IP, any hit coming from that IP will be permanently removed from your report data.
In “Admin” page, select the view you want to add a filter to and click “Filter”. On the add filter page, you will be able to set the filter information like so:

Filed under: Digital Analytics→Documentation
Tags: digital analytics, filters, Google Analytics, transform data, web analytics
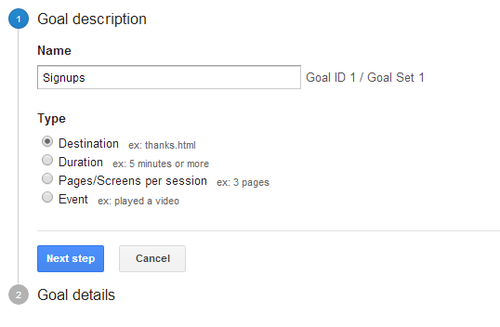
Additionally, you can set up goals to transform your data. Setting up goals can create new metrics like conversions and conversion rate. For example, you can set up a goal to track sign ups. Each time someone signs up, it will be recorded in Google Analytics as a conversion. In “Admin” page, select the view you want to add a goal to and click “Goals”. Click “New Goal”. Input your goal name and goal type then click next step.

Let’s say that every time a person signs up they are sent to the page: /registration-complete.html. You can set that as your destination page URL. You can also assign a value. For example, if you sell a service that costs $15 you can set the value of each sign up to $15 giving your conversions a monetary value. Even if they do not pay right away and are just a prospect, you can set a monetary value to your goal. For instance, if on average 1 person out of 5 signups actually buy your service at $15 after signing up, you can set the value for each sign up to be equivalent to $3 per sign up since it takes 5 signups for one $15 conversion (5 * $3 per sign up = $15 conversion).

Filed under: Digital Analytics→Documentation
Tags: conversions, digital analytics, goals, Google Analytics, transform data, web analytics


